Using CSOM with SAML Authentication (ADFS)

Topics: ADFS 3.0, SharePoint 2013, claims authentication, on-premise, Azure, CSOM, SAML

Description

Recently, I was tasked with making CSOM work with these SAML-enabled web applications and host-named site collections.  So I went to the great Google and Bing parts bins, found some things that I could build upon, and got to work.

My first iteration or attempt at making CSOM work with SAML was straightforward.  I found a couple of articles that described how to use a WebClient to pop the ADFS login dialog, which then set the security token that the CSOM ClientContext used.  Works great and it is not complicated.

Problem

But at about 3 a.m. one morning, I woke up with a thought: what if I wanted to do the same thing without prompting anybody, such as for running CSOM code as a scheduled task?  So I spent some evenings on the couch researching this, gathering useful “parts” from folks online, and writing additional code.  And Fiddler and Postman were my good friends, too.

The end result shown below is a functional console application that authenticates to ADFS, obtains a security token, extracts and repackages the FedAuth cookie, and uses the FedAuth cookie for the SharePoint CSOM ClientContext to do work against a SharePoint list.

In order to make this work, an intimate understanding of the ADFS configuration is needed.

Solution

Credit and thanks for certain sections of code go to the posts identified in the source code comments and bolded.  No wheels were reinvented in the making of this solution, only custom code.  Please visit those links highlighted in the source code below before examining this code.

Note that this code has a dependency on these NuGet packages, one of which delivers TokenHelper.cs and SharePointContext.cs.

<packages>
 <package id="AppForSharePointOnlineWebToolkit" version="3.1.2" targetFramework="net45" />
 <package id="Microsoft.AspNet.WebApi.Client" version="5.2.3" targetFramework="net45" />
 <package id="Microsoft.AspNet.WebApi.Core" version="5.2.3" targetFramework="net45" />
 <package id="Newtonsoft.Json" version="6.0.4" targetFramework="net45" />
</packages>
using System;
using System.IdentityModel.Protocols.WSTrust;
using System.IdentityModel.Tokens;
using System.IO;
using System.Net;
using System.Net.Security;
using System.Security.Cryptography.X509Certificates;
using System.ServiceModel;
using System.ServiceModel.Security;
using System.Text;
using System.Web;
using System.Xml;
using SP = Microsoft.SharePoint.Client;

namespace MyConsoleApp
{
 class Program
 {
 private static string adfsEndpoint = "https://somesite.xxxx.loc/_trust/"; // Endpoint for site from where we get the token 
 private static string adfsRealm = "urn:somesite.xxxx.loc:somesite"; // ADFS realm that contains the endpoint above
 private static CookieContainer fedAuth = new CookieContainer();
 private static string webUrl = "https://somesite.xxxx.loc/finance";
 private static string fedAuthRequestCtx = HttpUtility.UrlEncode(string.Format("{0}/_layouts/15/Authenticate.aspx?Source=%2ffinance", webUrl));

 static void Main(string[] args)
 {
 // BEGIN adapted for C# from https://blogs.msdn.microsoft.com/besidethepoint/2012/10/17/request-adfs-security-token-with-powershell/

 string adfsBaseUri = "https://sts.xxxx.loc"; // your ADFS farm URL
 string adfsTrustEndpoint = "usernamemixed"; // OOTB ADFS, do not change
 string adfsTrustPath = "adfs/services/trust/13"; // OOTB ADFS, do not change
 string domain = "EUROPE"; // domain of AD account; should be in config file or propmted from the command line
 string pwd = "Quercus9%%"; // password of domain account; should be a secure string from config file, but you get the idea
 string userName = "jdoe@xxxx.loc:"; // UPN of domain account in AD

 EndpointAddress ep = new EndpointAddress(adfsBaseUri + "/" + adfsTrustPath + "/" + adfsTrustEndpoint);
 WS2007HttpBinding binding = new WS2007HttpBinding(SecurityMode.TransportWithMessageCredential);
 binding.Security.Message.EstablishSecurityContext = false;
 binding.Security.Message.ClientCredentialType = MessageCredentialType.UserName;
 binding.Security.Transport.ClientCredentialType = HttpClientCredentialType.None;

 WSTrustChannelFactory wstcf = new WSTrustChannelFactory(binding, ep);
 wstcf.TrustVersion = TrustVersion.WSTrust13;
 NetworkCredential cred = new NetworkCredential(userName, pwd, domain);
 wstcf.Credentials.Windows.ClientCredential = cred;
 wstcf.Credentials.UserName.UserName = cred.UserName;
 wstcf.Credentials.UserName.Password = cred.Password;
 var channel = wstcf.CreateChannel();

 string[] tokenType = { "urn:oasis:names:tc:SAML:1.0:assertion", "urn:oasis:names:tc:SAML:2.0:assertion" };
 RequestSecurityToken rst = new RequestSecurityToken();
 rst.RequestType = RequestTypes.Issue;
 rst.AppliesTo = new EndpointReference(adfsRealm);
 rst.KeyType = KeyTypes.Bearer;
 rst.TokenType = tokenType[0]; // Use the first one because that is what SharePoint itself uses (as observed in Fiddler).

 RequestSecurityTokenResponse rstr = new RequestSecurityTokenResponse();
 var cbk = new System.Net.Security.RemoteCertificateValidationCallback(ValidateRemoteCertificate);
 ServicePointManager.ServerCertificateValidationCallback = (sender, certificate, chain, sslPolicyErrors) => { return true; };
 SecurityToken token = null;
 try
 {
 token = channel.Issue(rst, out rstr);
 }
 finally
 {
 ServicePointManager.ServerCertificateValidationCallback = cbk;
 }

 // END adapted for C# from https://blogs.msdn.microsoft.com/besidethepoint/2012/10/17/request-adfs-security-token-with-powershell/

 // BEGIN adapted from https://github.com/OfficeDev/PnP-Sites-Core/blob/master/Core/SAML%20authentication.md

 Cookie fedAuthCookie = TransformTokenToFedAuth(((GenericXmlSecurityToken)token).TokenXml.OuterXml);
 fedAuth.Add(fedAuthCookie);

 // END adapted from https://github.com/OfficeDev/PnP-Sites-Core/blob/master/Core/SAML%20authentication.md

 // PERFORM CSOM OPS HERE:

 string listName = "Some Existing List";
 using (SP.ClientContext ctx = new SP.ClientContext(webUrl))
 {
 ctx.ExecutingWebRequest += ctx_ExecutingWebRequest;
 SP.CamlQuery query1 = new SP.CamlQuery();
 query1.ViewXml =
 "<View>" +
 "<Query>" +
 "<OrderBy>" +
 "<FieldRef Name='Title' Ascending='FALSE'/>" +
 "</OrderBy>" +
 "</Query>" +
 "<RowLimit>10</RowLimit>" +
 "</View>";
 SP.List list = ctx.Web.Lists.GetByTitle(listName);
 SP.ListItemCollection items = list.GetItems(query1);
 ctx.Load(items);
 ctx.ExecuteQuery();
 for (int i = 0; i < items.Count; i++)
 {
 SP.ListItem item = items[i];
 ctx.Load(item);
 ctx.ExecuteQuery();
 }
 }
 }

 static void ctx_ExecutingWebRequest(object sender, SP.WebRequestEventArgs e)
 {
 e.WebRequestExecutor.WebRequest.CookieContainer = fedAuth;
 }

 private static Cookie TransformTokenToFedAuth(string samlToken)
 {
 // Adapted from https://github.com/OfficeDev/PnP-Sites-Core/blob/master/Core/OfficeDevPnP.Core/IdentityModel/TokenProviders/ADFS/BaseProvider.cs

 samlToken = WrapInSoapMessage(samlToken, adfsRealm);
 string stringData = String.Format("wa=wsignin1.0&wctx={0}&wresult={1}", fedAuthRequestCtx, HttpUtility.UrlEncode(samlToken));
 HttpWebRequest req = HttpWebRequest.Create(adfsEndpoint) as HttpWebRequest;
 req.Method = "POST";
 req.ContentType = "application/x-www-form-urlencoded";
 req.CookieContainer = new CookieContainer();
 req.AllowAutoRedirect = false;
 Stream newStream = req.GetRequestStream();

 byte[] data = Encoding.UTF8.GetBytes(stringData);
 newStream.Write(data, 0, data.Length);
 newStream.Close();
 HttpWebResponse resp = req.GetResponse() as HttpWebResponse;
 var encoding = ASCIIEncoding.ASCII;
 string responseText = "";
 using (var reader = new System.IO.StreamReader(resp.GetResponseStream(), encoding))
 {
 responseText = reader.ReadToEnd();
 }
 return resp.Cookies["FedAuth"];
 }

 [System.Diagnostics.CodeAnalysis.SuppressMessage("Microsoft.Globalization", "CA1303:Do not pass literals as localized parameters", MessageId = "System.Xml.XmlDocument.CreateTextNode(System.String)")]
 private static string WrapInSoapMessage(string stsResponse, string relyingPartyIdentifier)
 {
 // This method code is unchanged in its entirety from https://github.com/OfficeDev/PnP-Sites-Core/blob/master/Core/OfficeDevPnP.Core/IdentityModel/TokenProviders/ADFS/BaseProvider.cs.
 // I added in two places some inline commented code, which deals with using SAML 2.0 XML schema instead of 1.x. But SharePoint doesn't use 2.0. 

 XmlDocument samlAssertion = new XmlDocument();
 samlAssertion.PreserveWhitespace = true;
 samlAssertion.LoadXml(stsResponse);

 //Select the book node with the matching attribute value.
 String notBefore = /*samlAssertion.DocumentElement["Conditions"]*/samlAssertion.DocumentElement.FirstChild.Attributes["NotBefore"].Value;
 String notOnOrAfter = /*samlAssertion.DocumentElement["Conditions"]*/samlAssertion.DocumentElement.FirstChild.Attributes["NotOnOrAfter"].Value;

 XmlDocument soapMessage = new XmlDocument();
 XmlElement soapEnvelope = soapMessage.CreateElement("t", "RequestSecurityTokenResponse", "http://schemas.xmlsoap.org/ws/2005/02/trust");
 soapMessage.AppendChild(soapEnvelope);
 XmlElement lifeTime = soapMessage.CreateElement("t", "Lifetime", soapMessage.DocumentElement.NamespaceURI);
 soapEnvelope.AppendChild(lifeTime);
 XmlElement created = soapMessage.CreateElement("wsu", "Created", "http://docs.oasis-open.org/wss/2004/01/oasis-200401-wss-wssecurity-utility-1.0.xsd");
 XmlText createdValue = soapMessage.CreateTextNode(notBefore);
 created.AppendChild(createdValue);
 lifeTime.AppendChild(created);
 XmlElement expires = soapMessage.CreateElement("wsu", "Expires", "http://docs.oasis-open.org/wss/2004/01/oasis-200401-wss-wssecurity-utility-1.0.xsd");
 XmlText expiresValue = soapMessage.CreateTextNode(notOnOrAfter);
 expires.AppendChild(expiresValue);
 lifeTime.AppendChild(expires);
 XmlElement appliesTo = soapMessage.CreateElement("wsp", "AppliesTo", "http://schemas.xmlsoap.org/ws/2004/09/policy");
 soapEnvelope.AppendChild(appliesTo);
 XmlElement endPointReference = soapMessage.CreateElement("wsa", "EndpointReference", "http://www.w3.org/2005/08/addressing");
 appliesTo.AppendChild(endPointReference);
 XmlElement address = soapMessage.CreateElement("wsa", "Address", endPointReference.NamespaceURI);
 XmlText addressValue = soapMessage.CreateTextNode(relyingPartyIdentifier);
 address.AppendChild(addressValue);
 endPointReference.AppendChild(address);
 XmlElement requestedSecurityToken = soapMessage.CreateElement("t", "RequestedSecurityToken", soapMessage.DocumentElement.NamespaceURI);
 XmlNode samlToken = soapMessage.ImportNode(samlAssertion.DocumentElement, true);
 requestedSecurityToken.AppendChild(samlToken);
 soapEnvelope.AppendChild(requestedSecurityToken);
 XmlElement tokenType = soapMessage.CreateElement("t", "TokenType", soapMessage.DocumentElement.NamespaceURI);
 XmlText tokenTypeValue = soapMessage.CreateTextNode("urn:oasis:names:tc:SAML:1.0:assertion");
 tokenType.AppendChild(tokenTypeValue);
 soapEnvelope.AppendChild(tokenType);
 XmlElement requestType = soapMessage.CreateElement("t", "RequestType", soapMessage.DocumentElement.NamespaceURI);
 XmlText requestTypeValue = soapMessage.CreateTextNode("http://schemas.xmlsoap.org/ws/2005/02/trust/Issue");
 requestType.AppendChild(requestTypeValue);
 soapEnvelope.AppendChild(requestType);
 XmlElement keyType = soapMessage.CreateElement("t", "KeyType", soapMessage.DocumentElement.NamespaceURI);
 XmlText keyTypeValue = soapMessage.CreateTextNode("http://schemas.xmlsoap.org/ws/2005/05/identity/NoProofKey");
 keyType.AppendChild(keyTypeValue);
 soapEnvelope.AppendChild(keyType);

 return soapMessage.OuterXml;
 }

 private static bool ValidateRemoteCertificate(object sender, X509Certificate certificate, X509Chain chain, SslPolicyErrors policyErrors)
 {
 // It may be insightful to examine the parameters here, while debugging, although the function only returns a value of true regardless of those parameters.
 return true;
 }
 }
}

Regular Expressions (RegEx) – Wildcard Pattern Find and Replace – Visual Studio

On a recent project where I used ILSpy and Reflector.NET to extract source code from an old DLL, I ended up with some thousands of slightly incorrect things.  So in order to make the code workable, I had to do a wildcard find of complex things and fix them using Find and Replace in Visual Studio.

I needed to do a wildcard replace of things like this:
.set_PropName(somevalue);

with a format like this:
.PropName = somevalue;

After experimenting, the following Find and Replace criteria worked.  (Make sure to select the little [.*] icon in the Find and Replace window, which tells Visual Studio 2013 or later to use regular expressions. Also, only ever just do a Find All before replacing even a single match until you tune your regex find statement exactly as you need it.)

Find box:
.set_(.[a-zA-Z0-9\-\"_]*)(\()(.[a-zA-Z0-9\-\"_]*)(\));

Replace box:
.$1 = $3;

What is all this madness?  Well, a $1, $2, $3, etc. in the Replace statement refers to each of the paren-delimited groups of info in the Find statement.  Regex find groups are delimited with ( and ).  So the first group is (.[a-zA-Z0-9\-\”_]*) and the third group is (.[a-zA-Z0-9\-\”_]*).

BEST PRACTICES:
Check code into the source repository first. Use Find All, not Replace All, in order to examine what is going to be touched by the replace operation. In the Find Results window, examine the found items one at a time for accuracy, since regular expression matching often finds more than is expected. Then replace only one or two items to see if the replace statement is also correct.

LOTS MORE EXAMPLES

To find uninitialized string variables, such as string myStringVar;, I placed this in the Find box:
string (.[a-zA-Z0-9_]*?)(\;)
To replace with initial value of string.Empty, such as string myStringVar = string.Empty;, I placed this in the Replace box:
string $1 = string.Empty;

To find unwanted extra closing paren, such as this.lblMyLabel.Text), I placed this in the Find box:
= this.lbl(.*?).Text\)
To replace, getting rid of unwanted unnecessary closing paren, such as this.lblMyLabel.Text, I placed this in the Replace box:
= this.lbl$1.Text

More examples are below. The first line goes in the Find box and the second line goes in the Replace box. I first opened open all my source files in the VS IDE or else VS Find and Replace – Entire Solution does not find everything all at once.

Change all instances of int somevariable; to int somevariable = 0;
int (.[a-zA-Z0-9_]*?)(\;)
int $1 = 0;

Change all instances of .get_SomePropName() to .SomePropName
.get_(.[a-zA-Z0-9_]*?)(\(\))
.$1

Change all instances of .ItemType == somenumber to .ItemType == (ListItemType)somenumber
.ItemType == (.[0-9]*?)
.ItemType == (ListItemType)$1

Change all instances of (SomeObject.PartialMethodNameRestOfTheMethodName to (QualifiedName.SomeObject.PartialMethodNameRestOfTheMethodName
\(SomeObject.(.[a-zA-Z0-9]*?)RestOfTheMethodName
(QualifiedName.SomeObject.$1RestOfTheMethodName

Change all instances of .get_Item(SomeKeyHere) to [SomeKeyHere]
.get_Item\((.[a-zA-Z0-9_]*?)(\))
[$1]

Change all instances of .get_Item("SomeKeyHere") to ["SomeKeyHere"]
.get_Item\((.[a-zA-Z0-9_\"]*?)(\))
[$1]

Comment out an entire paragraph of code, on multiple lines and with brackets:

To change this

IEnumerator _myvar_ref_0;
if (_myvar_ref_0 is IDisposable)
{
((IDisposable)_myvar_ref_0).Dispose();
}

Into this
// IEnumerator _myvar_ref_0; /* 2015-01 commented code */
// if (_myvar_ref_0 is IDisposable) /* 2015-01 commented code */
/*{
((IDisposable)_myvar_ref_0).Dispose();
}*/ /* 2015-01 commented code */

I created and used the following Find and Replace statements (in three sepearate Find-Replace operations)
Set 1
Find
IEnumerator _myvar(.[a-zA-Z0-9_]*?)(\;)
Replace
// IEnumerator _myvar$1; /* 2015-01 commented code */
Set 2
Find
(\*\/\r\n.[\t]*)if (\(_myvar)(.[a-zA-Z0-9_]*?)( is IDisposable\))(\r\n)
Replace
$1// if $2$3$4 /* 2015-01 commented code */$5
Set 3
Find
(\*/\r\n.[\t]*)({\r\n.[\t]*\(\(IDisposable\)_myvar)(.[a-zA-Z0-9_]*)(\)\.Dispose\(\)\;\r\n.[\t]*\})
Replace
$1/*$2$3$4*/ /* 2015-01 commented code */

Windows RT store app dev – Inputs to / outputs from public and private async functions in C# and VB.NET

Windows RT (Windows 8.1) does not support exposing Task<T> on public methods and properties of class libraries (winmd files). As such, we are told to use IAsyncOperation<T> in place of Task<T>, since it provides similar functionality.

Here is an example of that in C#. The public function wraps the private one and thus allowed me to “await” my GetSomeData() function from another project that consumes this library.

private async Task<SomeOutput> GetSomeDataInternal(SomeInput inp)
{
SomeOutput ou = new SomeOutput();
using (var r = new StreamReader(await inp.OpenStreamForReadAsync()))
{
ou = await r.ReadToEndAsync();
}
return ou;
}

public IAsyncOperation<SomeOutput> GetSomeData(SomeInput inp)
{
return (IAsyncOperation<SomeOutput>)AsyncInfo.Run((System.Threading.CancellationToken ct) => GetSomeDataInternal(inp));
}

Calling the public function looks like this:

Dim myLib As MyLibrary.Utils = New MyLibrary.Utils()
Dim inp As New SomeInput()
Dim ou As SomeOutput = Await myLib.GetSomeData(inp)

All is well and good with a provider class library in C#. But that is not the case in pure VB.NET. I much prefer C# for complex things, but one must travel to where the river flows. So this had to be in VB.NET. The problem: when I attempted to do something similar to the above entirely in VB.NET, I encountered a COM error. So in order to make everything work, I devised the following code.

(Disregard that the output is gotten by accessing a property instead of calling a function; the main thing here is how to wrap the async private function in a public one and call it without COM errors and typecasting errors.)

Private _inp As SomeInput()
Public Property TheInput As SomeInput
Get
Return Me._inp
End Get
Set(value As SomeInput)
Me._inp = value
End Set
End Property

Public ReadOnly Property TheOutput As IAsyncOperation(Of SomeOutput)
Get
Return AsyncInfo.Run(Of SomeOutput)(Function(ct As System.Threading.CancellationToken) GetTheOutput())
End Get
End Property

Private Async Function GetTheOutput() As Task(Of SomeOutput)
Dim s As StorageFile = Await Windows.Storage.KnownFolders.PicturesLibrary.GetFileAsync(Me._inp)
Dim ou As New SomeOutput()
Await ou.SetSourceAsync(Await s.OpenReadAsync())
Return ou
End Function

So the above wrapped code was necessary to make Windows RT happy, since Task<T> may not be exposed publicly.
And I called the function (or in this case got the property) like so:

Dim myClass As New MyClass()
Dim inp As New SomeInput()
myClass.TheInput = inp

Dim ou As SomeOutput = Await myClass.TheOutput.AsTask()

AsTask() was necessary to cast the IAsyncOperation<T> back to Task<T> and make VB.NET happy.

So there are several things mentioned here:
– AsyncInfo.Run() in VB.NET
– Disentangling data from an async function in C# and VB.NET
– Avoiding the COM error
– Avoiding the typecasting error

Batch-Populate InfoPath Forms in SharePoint from Flat File

The following code was a way that I devised to batch-load an InfoPath form library from a flat file, autopopulating both the InfoPath form data and the metadata of the SharePoint library.

Overview

The purpose of this code was to batch load flat file records into a SharePoint InfoPath form library, creating one document for each row of the flat file.

This builds on various techniques and uses LINQ to load the flat file, XML serializer and text writer to create and load an XML document whose schema is that of the InfoPath form and does an HTTP PUT to save the document to the form library in SharePoint for each row of the flat file.

Note that the display of the code below is cut off due to the WordPress template formatting.  Copy and paste the code to Visual Studio to read it more easily.

Directions

To experiment with this code, follow these steps:

  1. Cut and paste the following code into a new Visual Studio console application.
  2. Follow the directions in the code comments (in bold + italics + underline below) to create and add the myschema.XSD-as-C# class file to the console project.
  3. Use the Ctrl+K+D to fix the code formatting in Visual Studio.  The indentation was lost on pasting this code into this blog entry.

Source code

 using System;
 using System.IO;
 using System.Linq;
 using System.Net;
 using System.Text;
 using System.Web;
 using System.Xml;
 using System.Xml.Linq;
 using System.Xml.Serialization;

 /*
 * NOTES ABOUT THIS CONSOLE APPLICATION:
 *
 * Put this project under C:\PROJECTS on your dev machine, if you like, to become
 * C:\PROJECTS\Load_InfoPath_and_Metadata_from_Flatfile.
 *
 * This project got a bit of code from the section 'Populate and Upload Form Data' in this
 * article: http://www.codeproject.com/KB/sharepoint/InfopathForm.aspx that I wish to
 * acknowledge. Also, since this app will probably not be run on a web front end but
 * rather the client, this app does not use SharePoint framework objects. it uses the PUT
 * technique found on the internet instead.
 *
 * This code assumes that you have an InfoPath form with five text fields (col1 - col5).
 * This code assumes that your InfoPath form template is already uploaded to the form
 * library and that you can create a new document by clicking New from the form library
 * menu.
 *
 * This project is a Windows console application. The schema file of the InfoPath form
 * was used to create a C-sharp code file using the command xsd.exe /c /l:CS myschema.xsd,
 * the latter of which can be obtained either by exporting the InfoPath form's source
 * files using the InfoPath Designer or by viewing the form library in Windows Explorer
 * view and examining the hidden Forms folder.
 *
 * If the InfoPath form template itself changes, you must save the source files of the
 * InfoPath form to a folder on disk and run the command xsd.exe /c /l:CS myschema.xsd
 * on the myschema.xsd file. This will create a myschema.cs C-sharp code file. Add the
 * updated file to this project. Recompile this project and fix anything that the 
 * schema change may have broken (if anything). When the schema changes, very likely
 * you will have to add new fields to the code of the "fields" object below so that the
 * data will propagate into SharePoint.
 */

 namespace Load_InfoPath_and_Metadata_from_Flatfile
 {
 class Program
 {
 static void Main(string[] args)
 {
 // Read flat file in its entirety.
 // TO-DO: CHANGE THE PATH AND FILENAME TO MATCH YOUR FILE.

 // Note that our sample flat file contains several lines with contents like this:
 // some data col 1|some data col 2|some data col 3|some data col 4|some data col 5
 // some data col 1|some data col 2|some data col 3|some data col 4|some data col 5
 // some data col 1|some data col 2|some data col 3|some data col 4|some data col 5

 string[] flatFileLines =
 File.ReadAllLines(@"C:\FlatfileDropFolder\SAMPLE_FLAT_FILE.txt");
 // Load the flat file recs into a variable that we will use below
 // (an enumerable collection of anonymous types) (LINQ stuff)
 var flatFileRecs = from line in flatFileLines
 let items = line.Split(new char[] { '|' })
 select new
 {
 col1 = items[0],
 col2 = items[1],
 col3 = items[2],
 col4 = items[3],
 col5 = items[4]
 };

 // Iterate through each of the records, building an XML (InfoPath) document and uploading
 // it to our Projects library

 foreach (var rec in flatFileRecs)
 {
 // Instantiate a myFields object in order to populate the data for this flat file rec,
 // then populate all its fields from the "rec" variable that contains a record from the
 // flat file that we just loaded.
 myFields fields = new myFields();
 fields.col1 = rec.col1;
 fields.col2 = rec.col2;
 fields.col3 = rec.col3;
 fields.col4 = rec.col4;
 fields.col5 = rec.col5;
 // Create a memory stream object
 MemoryStream mstream = new MemoryStream();
 // Initialize the save location
 string saveLoc = "http://xyz.abcdef.com/sites/somesitecoll/somesite/MyLibrary";
 using (mstream)
 {
 // Create serializer and writer objects
 XmlSerializer serializer = new XmlSerializer(typeof(myFields));
 XmlTextWriter writer = new XmlTextWriter(mstream, Encoding.UTF8);
 /*
 * Fill in the following portion of the document:
 *
 * <?mso-infoPathSolution
 * name="urn:schemas-microsoft-com:office:infopath:Projects:-myXSD-2011-01-27T05-51-32"
 * solutionVersion="1.0.0.25"
 * productVersion="12.0.0.0"
 * PIVersion="1.0.0.0"
 * href="http://xyz.abcdef.com/sites/somesitecoll/somesite/MyLibrary/Forms/template.xsn"?>
 * <?mso-application progid="InfoPath.Document" versionProgid="InfoPath.Document.2"?>
 * <my:myFields
 * xmlns:xsi="http://www.w3.org/2001/XMLSchema-instance"
 * xmlns:my="http://schemas.microsoft.com/office/infopath/2003/myXSD/2011-01-07T05:51:32"
 * xmlns:xd="http://schemas.microsoft.com/office/infopath/2003"
 * xml:lang="en-US">
 *
 */
 // Configure XML document legibility
 writer.Formatting = Formatting.Indented;
 writer.Indentation = 4;
 // Write the XML junk that always appears at the top of the document
 writer.WriteStartDocument();
 // Insert infopath processing instructions
 // (Get the correct parameters for this by examining a saved form in your library.)
 string msoInfoPathSolution =
 "name=\"urn:schemas-microsoft-com:office:infopath:Projects:-myXSD-2011-01-27T05-51-32\" " +
 "solutionVersion=\"1.0.0.25\" " +
 "productVersion=\"12.0.0.0\" " +
 "PIVersion=\"1.0.0.0\" " +
 "href=\"" + saveLoc + "/Forms/template.xsn\"";
 writer.WriteProcessingInstruction("mso-infoPathSolution", msoInfoPathSolution);
 writer.WriteProcessingInstruction("mso-application",
 "progid=\"InfoPath.Document\" versionProgid=\"InfoPath.Document.2\"");
 // Add namespaces
 XmlSerializerNamespaces ns = new XmlSerializerNamespaces();
 ns.Add("xsi", "http://www.w3.org/2001/XMLSchema-instance");
 ns.Add("my", "http://schemas.microsoft.com/office/infopath/2003/myXSD/2011-01-07T05:51:32");
 ns.Add("xd", "http://schemas.microsoft.com/office/infopath/2003");
 // Serialize the field data into the XML document, producing the data in XML elements
 // the way that InfoPath expects them
 serializer.Serialize(writer, fields, ns);
 // Close the document
 writer.WriteEndDocument();
 // Read the bytes out of the writer and into a byte array appropriately sized
 int len = (int)writer.BaseStream.Length;
 byte[] fileBytes = new byte[len];
 writer.BaseStream.Position = 0;
 writer.BaseStream.Read(fileBytes, 0, len);
 // Establish security context
 NetworkCredential netCred =
 new NetworkCredential("username_here", "password_here", "DOMAIN_HERE");
 // Upload the XML InfoPath document to the Projects library using HTTP PUT
 // (This means that access to a web front end is not needed.)
 WebClient webClient = new WebClient();
 webClient.Credentials = netCred;
 string saveFilename =
 HttpUtility.UrlPathEncode(saveLoc + "/" + fields.Project_Name + ".xml");
 byte[] udResult =
 webClient.UploadData(saveFilename, "PUT", fileBytes);
 }
 }
 }
 }
 }

Inserting CSV file into SQL database using LINQ, lambda, no foreach loop

The following code demonstrates how to insert the contents of a CSV file into a SQL table using a minimum of code.  LINQ, lambda expressions and one line of code instead of a foreach or for…next loop were used.  The purpose is to demonstrate the use of LINQ, lambdas and the one-liner foreach, pretty slick C# stuff.

Some of the code will be cut off in the blog display on the right, and you will need to copy and paste it to Notepad to see it all. 

using System;
using System.IO;
using System.Linq;
using System.Text;

namespace MHDemo1
{
    public partial class _Default : System.Web.UI.Page
    {
        protected void Page_Load(object sender, EventArgs e)
        {
        }

        protected void btnTest_Click(object sender, EventArgs e)
        {
            string filename = Server.MapPath("~") +
                              "/UploadedFiles/input.txt";
            byte[] filebytes = null;
            using (FileStream fs = new FileStream(filename,
                                                  FileMode.Open,
                                                  FileAccess.Read))
            {
                filebytes = new byte[(int)fs.Length];
                fs.Read(filebytes, 0, filebytes.Length);
                fs.Close();
            }

            if (filebytes != null)
            {
                ASCIIEncoding enco = new ASCIIEncoding();
                string filedata = enco.GetString(filebytes);

                using (MHDemo1.DataClasses1DataContext ctxt =
                           new MHDemo1.DataClasses1DataContext())
                {
                    // Note: The following could all be on one line;
                    //       it is wrapped here to fit the blog page width. 

                    var recs =
                        (from item
                             in filedata.Split(new char[] { '\r', '\n' },
                                               StringSplitOptions.RemoveEmptyEntries)
                         select item.Split(new char[] { ',' })).Where(
                             r => r[0] != "Col1" && r.Length == 3);

                    // Note: The following could all be on one line;
                    //       it is wrapped here to fit the blog page width.
                    recs.ToList<string[]>().ForEach(i =>
                        ctxt.UpdateTable1(
                            null,
                            i[0],
                            i[1].Length > 0 ? int.Parse(i[1]) : (int?)null,
                            i[2].Length == 10 ? DateTime.Parse(i[2]) : (DateTime?)null,
                            false));
                }
            }
        }
    }
}

Where you see things like ‘r => r[0] != “Col1” && r.Length == 3’, imagine that being a little inline function with minimal decoration.  Imagine that ‘r’ is the input argument (an array in our case), ‘=>’ points to the innards of the function, and ‘ r[0] != “Col1” && r.Length == 3’ spits out all the elements of ‘r’ that do not contain a value of “Col1” and only when ‘r’ itself is an array with three values (r.Length == 3).  It takes a little getting used to, as far as looking at it is concerned, but it really makes sense if in your mind you decorate it with all the old fashioned decorative accoutrements.

The above code assumes that there is a button named btnTest on a web form in a web project, and that the web project contains LINQ to SQL data classes.  These steps were followed to create a sample project.  (The screen shots are in Spanish because that is how my virtual machine is configured, but the steps should be easily reproduced.) 

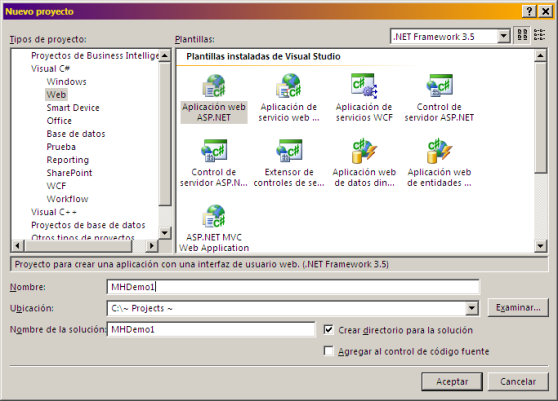
  1. Created a new web project:

    Step 1: create web project

    Step 1: create web project

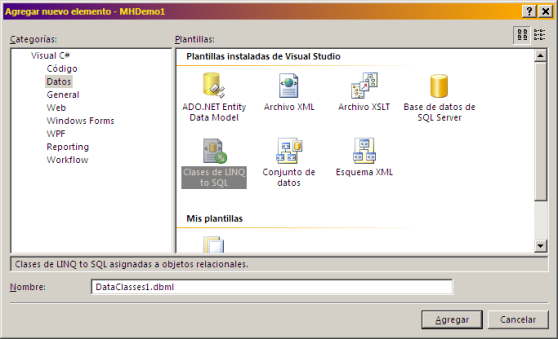
  2. Added a LINQ to SQL data classes element to the project using File – Add New Element – Visual C# – Data:

    Step 2: add LINQ to SQL data element to project

    Step 2: add LINQ to SQL data element to project

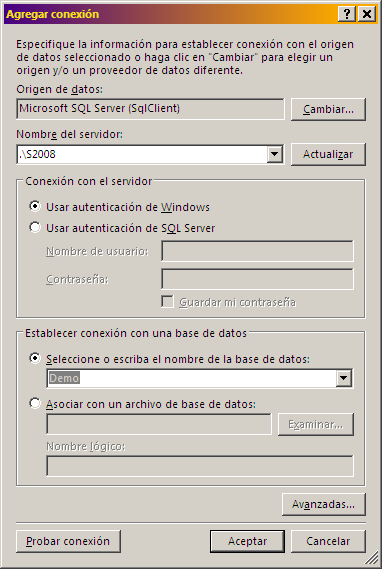
  3. Opened the Server Explorer window in the Visual Studio IDE.  Added a connection to a database server.  For the sake of this example, there is a SQL Server instance named .\S2008, a database named Demo, a table named Table1 and a stored procedure named dbo.UpdateTable1:

    Step 3: add a connection to your database

    Step 3: add a connection to your database

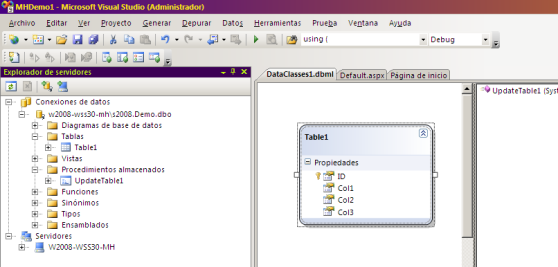
  4. Dropped the table and stored procedure onto to design surface of the DBML file:

    Step 4: drop the table and stored proc onto the DBML design surface

    Step 4: drop the table and stored proc onto the DBML design surface

  5. Added a sample CSV flat file to a folder named UploadedFiles under the root of the project:
Col1,Col2,Col3
Item one,250,2010-01-30
Item two,30,2011-05-01
Item three,500,2010-09-01
Item four,,2011-02-28